Published 1 Mar 2024
Article by
6 min read
What is a Pump Maintenance Checklist?
A pump maintenance checklist is used during pump inspections to ensure that they are in good working condition. Engineers or pump technicians can use this tool to identify operational and safety issues to prevent unforeseen pump breakdowns, malfunctions, or production cessation.
Importance
Pump maintenance is an essential procedure for ensuring that your pump systems (e.g.,sump pumps ) are working in good condition. Moreover, they should be conducted with safety practices in mind and in compliance with Occupational Health & Safety (OH&S) management system standards such as ISO 45001. This process usually consists of various maintenance jobs—from preventive and corrective to predictive and condition-based. To streamline this process, pump engineers and technicians can utilize digital checklists to their advantage.
A pump maintenance checklist serves as a guidance document in performing these checks. By outlining all required tasks in a concise list, pump maintenance teams can easily follow through with the process and check all vital parts without missing a single step. This way, they can capture any issues that may arise during inspections and complete their tasks with ease.
How to Perform Pump Maintenance Using a Checklist
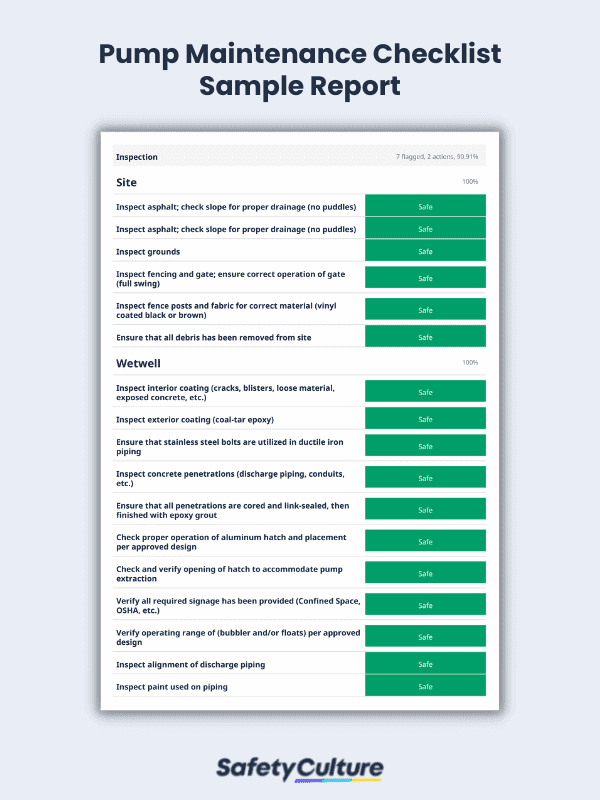
Pump Maintenance Checklist Sample PDF Report | SafetyCulture
When conducting pump maintenance using a checklist, it should follow these steps:
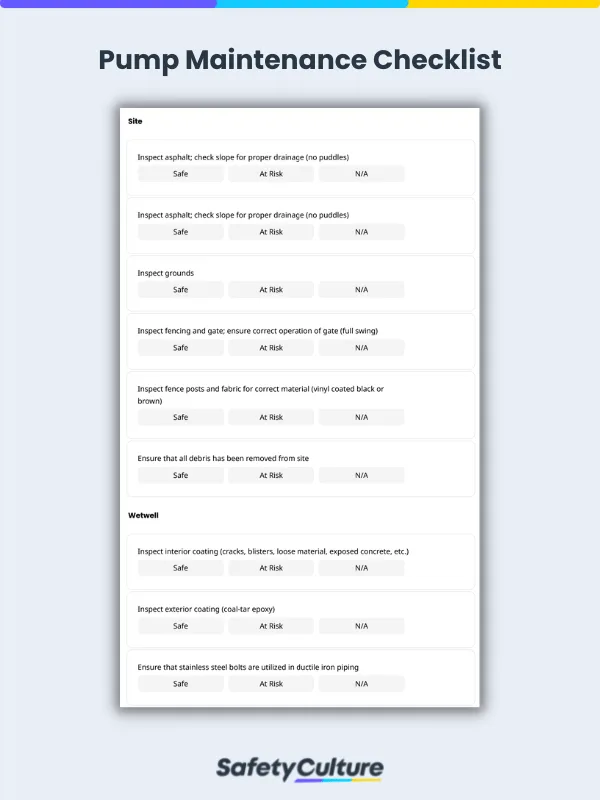
1. Inspect the Site.
Before checking the pump itself, it’s important to first survey the site where it’s located. Here are the key areas to inspect during this step:
Asphalt – for removal of debris
Grounds – for proper drainage in slopes
Fencing and gate systems – for proper operation in full swing
Fence posts and fabric – for correct material (i.e., vinyl-coated black or brown)
2. Check the Wetwell.
After inspecting the site, the next thing to check is the pump system’s wetwell. In this step, the pump technician visually inspects the coating and paint of the components for blisters, cracks, exposed concrete, loose materials, and other damage.
They will also check if the following components are aligned correctly and are running as per the approved design:
Penetrations
Hatches
Discharge piping
Conduits
Bubbler and/or floats
Poly ladder rungs
Ladder placement
3. Proceed with the Pumps.
Once you’re done with the wetwell, you can move on to the pumps. Begin by pulling each pump and reset, and then proceed with inspecting the alignment of rails, the disconnect flange seal, and ease of removal. Finish this step with a visual check on the pump’s paint, cord, and placement.
4. Inspect the Valve Vault and Piping.
When checking the valve vault and piping, it’s essential to inspect the following elements:
Paint on the interior and mechanical piping – for blisters, cracks, exposed concrete, loose material, and other damage
Discharge piping – for proper alignment (including those between the wetwell and valve vault)
Pressure gauges – for correct type and placement
Hatch opening
Required signage – as per the Occupational Safety and Health Administration (OSHA)
Drain line – at the same level from valve vault to wetwell
5. Look into the Electrical System.
For electrical checks, make sure to verify the following things:
All seal-offs are sealed with a sealing compound.
Pump motor leads continuously run from the pump to the control panel.
Stainless steel strain reliefs are used on all pump and float cords.
The bubbler line is sealed off in the conduit.
The seal-offs are placed in the vault and all conduit penetrations are grouted.
There is a signed, approved electrical inspection report.
All ground roads are accessible and have risers installed for access per specification.
6. Check the Pump’s Control Panel.
When inspecting the control panel of the pump system, pump technicians should ensure that:
The wiring scheme is in the door pocket.
The “control” side of the panel is placed facing the wet well.
There is proper UL labeling on the panel.
The enclosure is free from chipped paint or other damage.
The dry film thickness (DFT) follows the specification using a mil-thickness gauge.
The electrical inspection report is signed off by the governing electrical inspector.
All pilot lights are operational.
All wires are labeled properly.
All placards are in place.
All wiring debris has been removed from the enclosure.
The field wiring has been inspected.
An operation test of controls is conducted.
Additional motor nameplates are supplied by the pump manufacturer and placed by the crew on the interior door.
Specialty products are mounted and placed in the interior of the control panel.
7. Inspect the Telemetry System.
The telemetry system ensures that the data collected from the pipes are properly transmitted. For this system to work, pump technicians must first verify if all components (e.g., radio, antenna, all associated wiring, alarm points) have been provided for and pre-wired. They will also check the communication link to the base station and the field wiring. Lastly, they will verify if the standard mast and antenna are complete for the standard anchoring method.
8. Run an Operations Test for the Pump System.
Pump maintenance checks also involve operation tests for the pump system. During this process, the inspectors check for the following items:
Pump rotation
Throttle valve
Liquid level control system
The sealing flange of the pump
Pump clearances
Pump cords
High-water and low-water alarms
An example of a test performed during this stage is the draw-down test. This method measures the actual gallons per minute (GPM) on both pumps and compares the results to the design specifications.
9. Perform Another Test for the Generator.
After testing how the pump system operates, there will also be an operation test done for the generator. It aims to determine the efficiency, functionality, and longevity of the pump’s power source by simulating a power failure to see how the generator performs. This process typically lasts for 10 minutes.
10. Sign Off the Maintenance Form.
Lastly, finish the pump maintenance checklist with the inspector’s signature, along with the time and date stamp. The inspector can also provide their comments in the space allotted.
Tips for Effective Pump Maintenance
While it is important to proactively perform scheduled pump inspections and keep pumps in good working condition to maintain uninterrupted operation, it is vital to first ensure that the inspectors are safe.
Here are a few things to remember and prepare before performing pump maintenance checks:
Inspection Tools Make sure to have the right pump maintenance checklists, manuals, and inspection tools for the corresponding pumps that will be checked.
Personal Protective Equipment (PPE) Wear the appropriate PPE to mitigate workplace risks like slips & falls and prevent loose or unrecommended clothing from getting snagged by machinery.
Signal to Proceed Do not perform pump maintenance checks without receiving the “Go” signal. Maintenance checks may require machines and valves to be shut off or proper clearance before inspectors can enter premises (e.g., toolbox talk, lockout tagout, permit to work).
Aside from these, always immediately report any missing machine guards or pump shields should you observe these during inspections.

Still looking for a checklist?
Search, filter, and customize 60,000+ templates across industries and use cases.