A Guide to Understanding 5x5 Risk Assessment Matrix
This guide walks you through the basics of a 5×5 risk matrix: its definition, importance, components, and usage. Learn how this tool can help simplify your risk assessments.

Published 25 Sept 2025
Article by
8 min read
What is a 5×5 Risk Matrix?
A 5×5 risk matrix is a type of risk matrix that is visually represented as a table or a grid. It has 5 categories each for probability (along the X axis) and impact (along the Y axis), all following a scale of low to high. As a comprehensive tool used by organizations during the risk assessment stage of project planning, operations management, or job hazard analysis, a 5×5 risk matrix aims to identify the probability and impact levels of injury and risk exposure to a worker concerning workplace hazards.
Simply said, a risk matrix, or risk assessment matrix, is a visual tool that businesses use to prioritize potential risks based on their level of probability and impact. Teams typically leverage this tool during risk assessment processes to systematically evaluate and manage risks, ensuring that the most significant threats are addressed appropriately.
Why Use a 5×5 Risk Assessment Matrix?
For most organizations, having a tool to visually represent a risk assessment is paramount to effective operations management. Aside from the purpose of objectively rating risks based on their probability of occurrence and impact levels, a 5×5 risk matrix helps provide an easy-to-follow guide for future risk rating processes whenever a new hazard is identified.
This tool allows Environment, Health, and Safety (EHS) professionals conduct thorough risk assessments, having 5 rating levels for each component for a more accurate analysis. With the 5×5 risk matrix explained, compared to other versions like 3×3 and 4×4, the 5×5 version provides a more thorough way of rating risks using a 5-point scale.
Ultimately, the two main advantages of this using this tool are the following:
Helps simplify how various risk levels are represented
Reduces the need to conduct time-consuming quantitative analyses
5×5 Risk Matrix Example

5×5 Risk Matrix Example
Color-coding is crucial for a 5×5 risk assessment matrix template to represent the combination level of probability and impact of the identified risks. That said, high risks must be in red, moderate risks in yellow (amber), and low risks in green. Organizations, EHS professionals, and project managers can then use other closely-related colors, such as orange, light red, and light green, to differentiate the specific risk ratings.
A 5×5 risk matrix also aims to answer the question “What are the 5 risk rating levels in the risk assessment matrix?” A 5×5 risk matrix has two axes, or components to put it simply, that make up the whole table or grid: the Probability and the Impact. Under the two are 5 risk rating levels used to calculate risks.
Probability
Also called likelihood, the Probability (x-axis) pertains to the extent of how likely it is for the risk to occur. The 5 risk rating levels under this component are as follows:
Rare – unlikely to happen and/or have minor or negligible consequences
Unlikely – possible to happen and/or to have moderate consequences
Moderate – likely to happen and/or to have serious consequences
Likely – almost sure to happen and/or to have major consequences
Almost certain – sure to happen and/or have major consequences
Impact
Also called severity or consequences, the Impact (y-axis) aims to determine the level of effects that the hazard can cause to workplace health and safety.
While a 5×5 risk matrix can be tailored to the needs of an organization, the following represent the general terms used to describe the 5 levels to determine the risk’s impact:
Insignificant – won’t cause serious injuries or illnesses
Minor – can cause injuries or illnesses, only to a mild extent
Significant – can cause injuries or illnesses that may require medical attention but limited treatment
Major – can cause irreversible injuries or illnesses that require constant medical attention
Severe – can result in fatality
Each risk box represents the rating of a risk that is calculated based on its particular levels of probability and impact. In most cases, the 5×5 risk matrix uses numeric values to better represent the risk ratings.
Calculating Risks Using the 5×5 Risk Matrix
Probability x Impact = Risk Level
The first step is to assign a numeric value from 1 to 5, 1 being the lowest, for each of the categories under Probability and Impact. Then, use the formula of multiplying the value of the Probability to the value of Impact to determine the Risk Level.
To better understand how the various levels indicate the Probability and Impact, here’s a guide on the numeric values and their representation as a result of the analysis:
1-4: Acceptable – no further action may be needed and maintaining control measures is encouraged
5-9: Adequate – may be considered for further analysis
10-16: Tolerable – must be reviewed in a timely manner to carry out improvement strategies
17-25: Unacceptable – must implement cease in activities and endorse for immediate action
With these, you can improve your existing risk control measures as needed, and recommend further actions that your EHS and quality managers can reinforce toward a proactive safety culture.
How to Use a 5×5 Risk Matrix
To show you how easy it is to incorporate this problem-solving tool in your risk assessments, here is a complete and step-by-step guide on how to use a 5×5 risk matrix:
Step #1: Define the project details
Specify the key details regarding the project or analysis that the risk matrix is gonna be used in. Establish the name of the project, who conducted the risk matrix analysis, and the date and location of the analysis. By documenting these important details, it’s easier to track and go back to for future reference.
Step #2: Refer to the 5×5 risk matrix as a guide
As a visual-centric analysis tool, review the risk matrix table and familiarize yourself with what each number, color, and label represent. With this, it would be easier to perform and understand the result of the analysis.
Step #3: Establish the risk probability
Choose between rare, unlikely, moderate, likely, and almost certain to specify how likely or unlikely it is for the identified risk to happen. Take note of the corresponding number that this equates to–-we’d need that for later.
Step #4: Determine the risk impact
After deciding the probability of the risk happening, you may now establish the potential level of impact—if it does happen. The levels of risk severity in a 5×5 risk matrix are insignificant, minor, significant, major, and severe. Again, take note of its corresponding number because we’ll use it for the next step.
Step #5: Calculate the risk level
Since you already decided on the numeric value of risk probability and its severity, (if not yet, assign appropriately) all you have to do is multiply their corresponding numbers. Once you have the product or the answer to the equation, you will use this as a basis to determine the actual risk level. As mentioned in the previous section, the risk levels are acceptable, adequate, tolerable, and unacceptable.
Step #6: Put control measures in place
Establish risk control measures by adding recommendations and other relevant actions. These actions can encompass immediate implementation or long-term strategies aimed at resolving the issue both in the short and long term.
Step #7: Attach relevant signatures
Complete the risk matrix by providing relevant signatures of personnel and staff involved in the analysis.
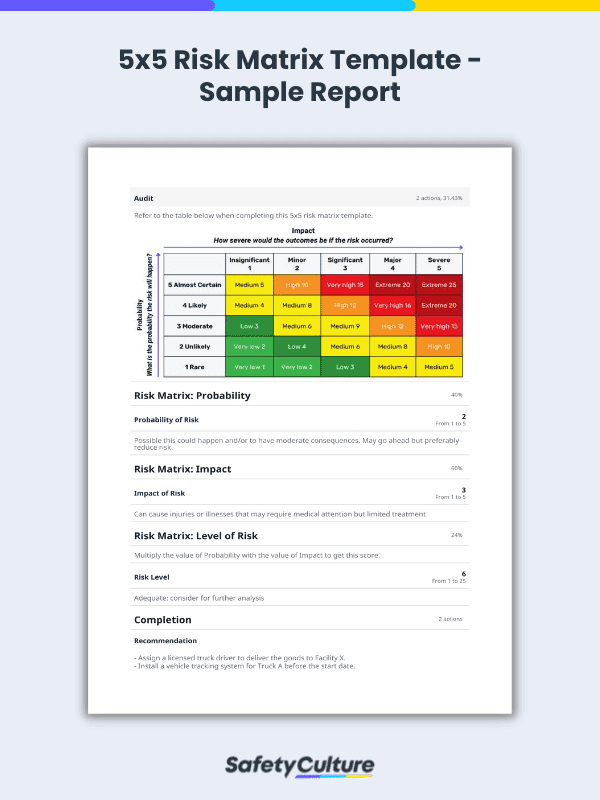
See below for an image of a completed report of a risk analysis matrix template:

5x5 Risk Matrix Sample Report | SafetyCulture
This risk control matrix template is ready-to-use and customizable according to business needs.
Examples of Industry Use
Here are some industry examples of when and how to use a 5×5 risk matrix to perform risk assessments efficiently and effectively.
ISO 45001 Compliance
ISO 45001:2018, an international standard covering best practices toward employee safety amidst workplace risks, is an example of where using a 5×5 risk matrix is greatly helpful. Since this standard aims to help reduce work-related risk for workers, the management can then use risk assessment tools such as a 5×5 risk matrix to aid in decision-making to mitigate or eliminate workplace hazards.
Improve your GRC management
Simplify risk management and compliance with our centralized platform, designed to integrate and automate processes for optimal governance.
Quality Risk Management
As part of an organization’s thorough quality risk management system, evaluating risks during the risk analysis stage is best done by using tools such as a 5×5 risk matrix. This can then result in a quantified expression of risk, having the output of the risk assessment as a numeric value or a qualitative description on the level of risk.
Risk Assessment Training: Your First Step to Building a Safety Culture
A good and effective risk assessment training can help your organization achieve a culture of safety where everyone takes responsibility for their own well-being and that of their colleagues. Prioritizing safety through Training can create a safer and more productive workplace. This way, everyone can focus on doing their best work without worrying about potential workplace hazards.
Below, we’ve handpicked some risk assessment courses that are designed to be short and highly targeted, so everyone can learn new safety skills in just a few minutes each day.
Take the first step towards a safer workplace by exploring our courses below:
Assess Risks Effectively with SafetyCulture (formerly iAuditor)
Why use SafetyCulture?
Quality managers, EHS professionals, and organization leaders must maximize technology to identify risks, list identified hazards, conduct assessments, and come up with strategies to promote continuous improvement. Using a dynamic mobile app solution such as SafetyCulture is the best example of how teams can streamline risk assessments.
✓ Simplify processes with digital checklists✓ Receive professional reports and share instantly✓ Use for teams of any size
Streamline your organization’s operations and workflow with our digital checklist. It empowers you to:
Maintain safety and compliance standards with customizable templates
Increase your team’s engagement and accountability including contractors and stakeholders
Create powerful workflows by integrating your existing software
Gain greater visibility and transparency with real-time reporting
Access unlimited storage and data security for your reports
Take advantage of our comprehensive features to optimize your operations and enhance workplace safety today.
FAQs about 5x5 Risk Matrix
In this article
- What is a 5×5 Risk Matrix?
- Why Use a 5×5 Risk Assessment Matrix?
- 5×5 Risk Matrix Example
- Calculating Risks Using the 5×5 Risk Matrix
- How to Use a 5×5 Risk Matrix
- Examples of Industry Use
- Risk Assessment Training: Your First Step to Building a Safety Culture
- Assess Risks Effectively with SafetyCulture (formerly iAuditor)
- FAQs about 5x5 Risk Matrix
Related articles
Environmental Safety
Safety

A Comprehensive Guide to Stormwater Pollution Prevention Best Management Practices (SWPPP BMP)
Learn about the types of best management practices for SWPP and the steps to effectively implement them in prevention plans.
Risk Assessment
Safety

The Ultimate Guide to Emergency Preparedness and Response
Learn how you can develop an effective emergency plan and stay one step ahead of natural disasters or other catastrophes.
Safety
Safety Management

Disaster Preparedness Plan
Learn more about the disaster preparedness plan, its importance, features, and example. Find out how a digital tool can help prepare against disasters.