Published 24 Jun 2026
Article by
6 min read
What is a Risk Register Template?
A risk register is a compilation of potential risks identified before, during, and after starting a new project. This tool, otherwise known as a risk register template, is used by risk managers and project managers to list emerging issues, manage risks and hazards, and implement solutions to mitigate possible setbacks during projects.
Risk Register vs Risk Management
Risk register is part of risk management and includes a list of risks, their descriptions, analysis, and plans for mitigation. Aside from the risk register, risk management also includes risk assessment, risk reporting, and risk governance. Another difference between risk register and risk management is that the former specifically focuses on recording the risks identified and the level of impact they may have, while the latter discusses the whole plan for managing risks from start to finish.
Why is it Important?
Using a risk register affects the outcome of the risk management process by highlighting crucial risks and specifically including mitigating actions to tackle those risks. Additionally, it helps recognize possible issues that may reappear in the future or in other projects. A risk register also offers the following benefits:
Proactively spot possible risks faced by the project or company, understand their nature, and emphasize their scope.
Identify the impact, likelihood, and severity of the mentioned risks and how they would affect your project.
Create mitigating and contingency actions and plans to lessen risks.
Track and monitor the status of risks and highlight those that should be prioritized.
Help prevent project delays and lower the probability of operational setbacks.
What to Include in a Risk Register Template
Risk registers and their elements vary depending on the industry and the risks associated with a specific project. The following components, however, are the items commonly included in creating a risk register:
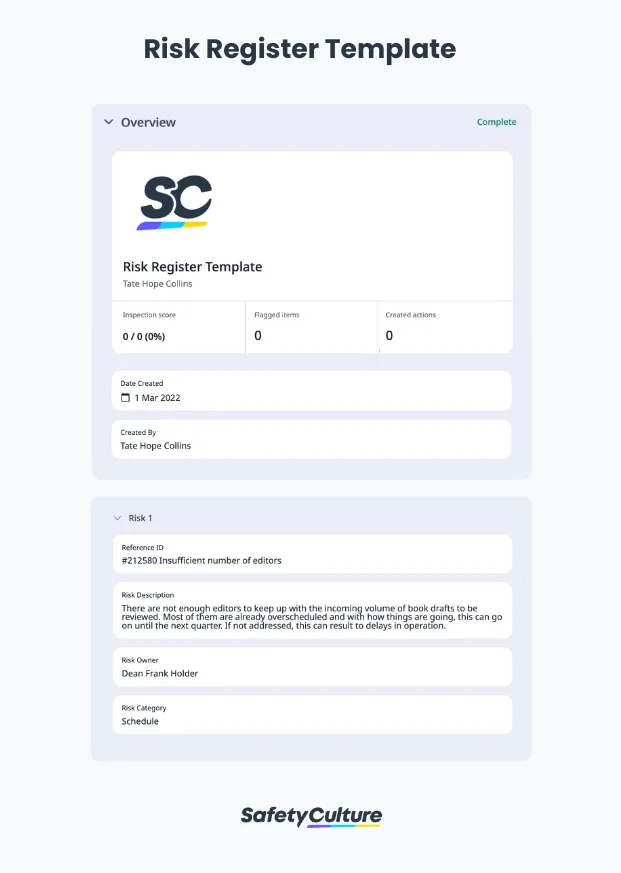
Risk ID
The risk ID is the name or number associated with the specific risk and is usually placed at the start of each risk register entry. Ensure that the risk ID is easily identifiable to help with the tracking process and so that team members can quickly find the identified risks.
Risk Description
The risk description is a short but accurate explanation of the scope of the risk and why it’s a potential issue. It should offer a high-level overview and describe the key points of the risk.
Risk Category
Various factors can impact a project, such as budget, schedule, technology, and other external elements. The specifications of the project should also be taken into account and further evaluation may be needed to identify each unique risk category.
Risk Likelihood
As the name suggests, risk likelihood is the probability of the risk occurring and typically uses a variation of not likely, likely, and very likely. It helps in identifying which risks should be addressed and prioritized based on their likelihood.
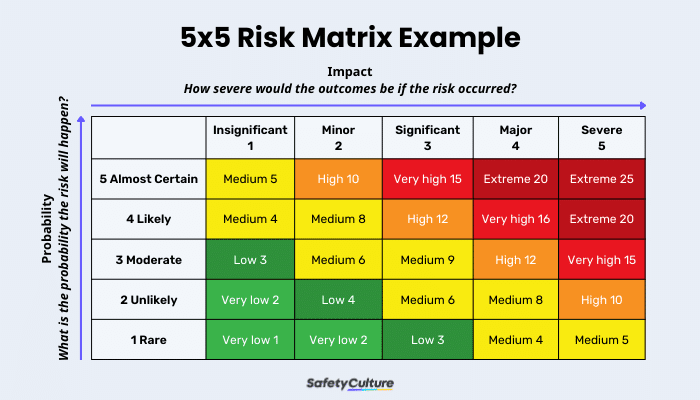
Risk Analysis
Risk analysis is the evaluation of the potential impact and severity of the risk on the project or the company. While the exact risk analysis method is different for each project or organization, the result (known as risk severity) is commonly categorized as either of the following: very low, low, medium, high, or very high.
This is an example of the risk matrix that you can follow when performing a risk analysis:
Risk Mitigation
Risk mitigation identifies possible mitigation plans to help tackle the risk, prevent it from happening, or lessen the impact it may have. The plan should be thorough and include a step-by-step solution on how to minimize the risk, identify the desired outcome, and describe how it will affect the impact and likelihood of the risk.
Risk Priority
Risk priority is determined by assigning a value to each risk or establishing it based on the combined elements of risk likelihood (probability) and risk analysis (potential impact). The higher the probability and potential impact, the more that a risk should be prioritized.
Risk Ownership
Risk ownership identifies the team member who is responsible for the specific risk. This ensures that all of the identified risks will be monitored and supervised accordingly.
Risk Status
Risk status helps communicate if the risk was successfully mitigated or is currently being addressed. Projects usually use the following status options: open, in progress, or closed.
How to Use a Risk Register: A Step-by-Step Guide
Below is a step-by-step guide on how to determine risks and analyze them:
Step 1: Identify potential risks
The first step is to identify and record all the potential risks that could derail or put a strain on your project. Some risks may not be apparent at the beginning, but recognizing and listing out as many risks as possible can help in proactively addressing them. While the number of risks may grow as the project progresses, it will also be advantageous to mitigate them as early as possible.
Step 2: Analyze, prioritize, and assign
This step will help identify which of the listed risks should be prioritized based on the severity, impact, likelihood, and other categories that could potentially affect the project. The result of this step will vary depending on the factors recognized, the value associated with each category, and their level of importance to the project. Since the analysis differs per project, determining which method would work best and would give an accurate result is vital in successfully mitigating the risks.
Step 3: Develop mitigating plans
In the third step, a response plan is developed for each listed risk. The response plan explains in detail how to lessen the chance of the risk occurring or how to minimize its impact on the project. A fully developed response plan uses one of the four types of risk mitigation strategies:
Risk Acceptance
Risk acceptance is used when a risk is unavoidable, and it would be more complicated to try to prevent it. Companies will accept the risk as long as it has a lower impact and would not be detrimental to the project.
Risk Avoidance
Risk avoidance is the action that prevents any exposure to a specific risk. It should be noted that risk avoidance usually has a high cost associated with it, as it cuts off or alters specific actions or tasks altogether.
Risk Limitation
Risk limitation aims to find other strategies to mitigate the risk if it can’t be completely avoided. Controlling these risks typically involves budget modification or utilizing secondary backups for items identified to be at risk, then implementing the changes without causing too much disruption.
Risk Transference
Companies use risk transference when the risk identified is not one of their distinctive competencies and is best managed by third parties who are experts in that specific task.
Step 4: Track, adjust, and update
In the final step, you’ll need to monitor the risks throughout the course of the project. It is best to update the risk register after every change so that it remains accurate and easier to track.
This could also be a great opportunity to identify which of the risk responses worked best and recognize issues that may reappear in the future.
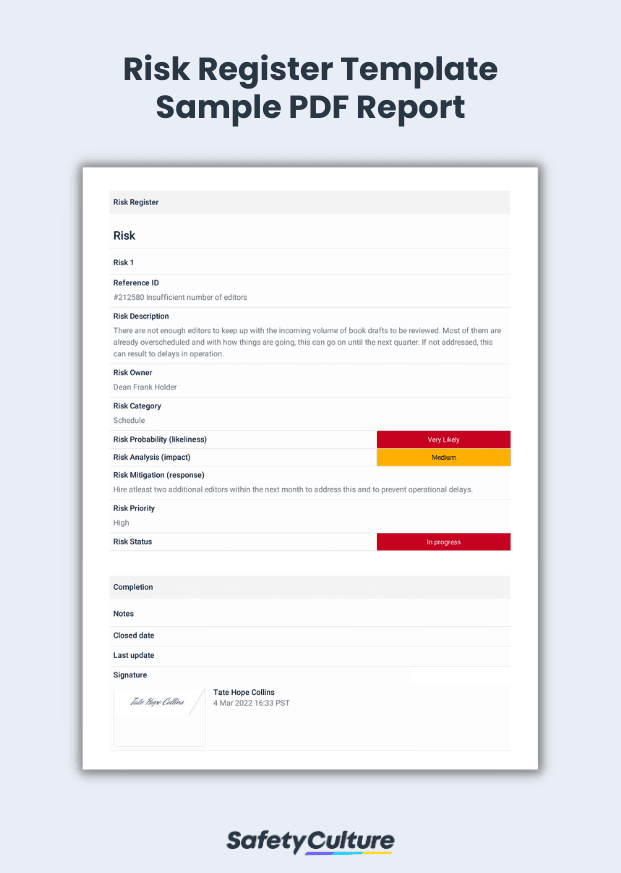
Risk Register Template PDF
Here’s an example of a completed risk register template in PDF format:

Still looking for a checklist?
Search, filter, and customize 60,000+ templates across industries and use cases.